Do you know how to set your LinkedIn profile to private? One of my friends in a networking group recently attended a LinkedIn seminar. The instructor gave a lot of information, but this one item stood out. Here’s how in a few simple steps:
- Sign in to your LinkedIn account.
- Next, click on “Profile” at the top of the navigation menu.
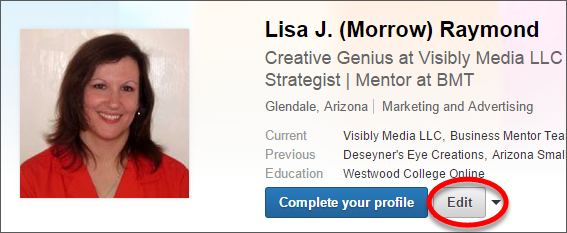
- Now click the “Edit” button below your name and header. This takes you to the overall editing mode.

- Next, click the blue “Edit” link next to your LinkedIn URL. You will find this below your photo. This allows you to start editing your public profile.
- Below “Public Profile” you should see two columns of information. The block on your right should allow you to customize your public profile with several choices.
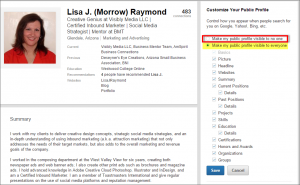
- Under “Customize Your Public Profile”, you should see two radio buttons. One allows you to set your profile to be visible to no one, the other by everyone. The default is “everyone”.
- To set your profile to private, select the radio button that allows “no one” to see your profile.
That’s it. Keep in mind, however, that it may take a few weeks before both Google and Bing register this change, and during this transition your profile is viewable by all.
I have a follow-up post that delves a bit into some reasons as to why you should (and shouldn’t) have a private profile. The choice you make should depend on your situation, your intentions, and your strategy for either finding a job or a project/new client. Consider all the possibilities and choose what makes sense to you.
If you want help setting up your profile or business page, please contact me here.
Be strategic. Be visible. Be found.


